Training Tasks
Five tasks are presented that initially explain the basic functions of the tool. As the tasks progress, advanced options are introduced, such as identifying consumers with high connection costs, allowing a certain level of undersupply instead of sizing for peak demand to reduce system costs, and the scenario where specific components are already in place and need to be complemented with additional energy converters.
It is recommended to create an account first. To do so, click on the 'Log in/Sign up' button in the upper right area. A registration form will appear; there, click on 'Register here' and follow the registration process.
It is recommended to create a new project for each task and name it accordingly, for example, 'Training Task 1'.
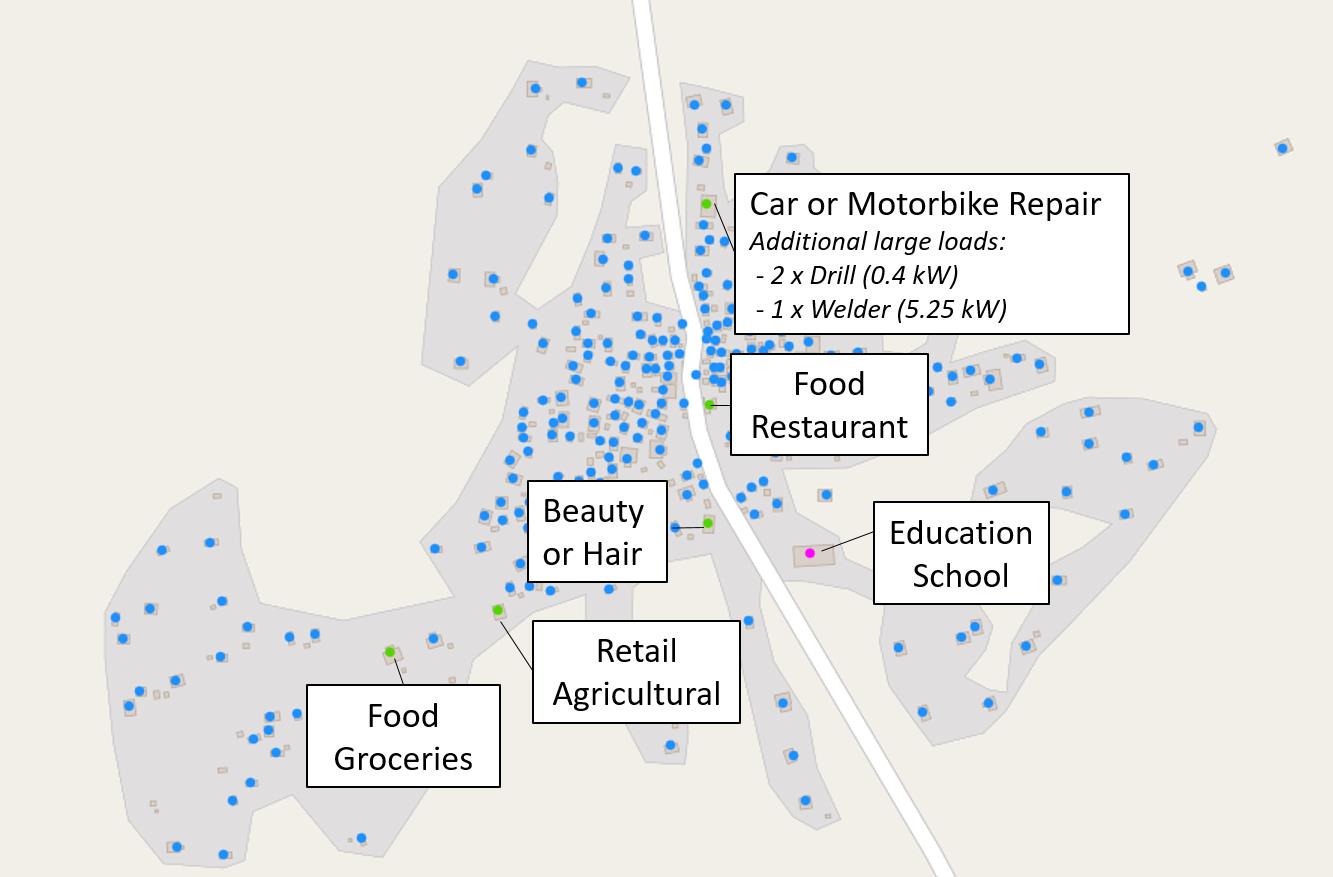
An off-grid system is to be planned for the Nigerian locality of Ikah Ichala (7.699508, 7.710631), to which all buildings in the village will be connected. The drawing tools are used to mark an area on the map where buildings are automatically identified as consumers. All consumers are defined as households by default. Change the consumer types to enterprises or public services for the consumers marked in the figure, and select the appropriate consumer categories.
In this task, we will not modify the Project Setup, Demand Estimation, Grid Design, and Energy System Design pages. Instead, we'll maintain the default parameters and proceed by clicking 'Next' or 'Optimize' in the final step.
This entails conducting a Demand Estimation based on the national average of rural areas. In terms of Grid Design, it involves connecting all consumers and adopting the default cost parameters for all components. For Energy System Design, the available components include PV systems, diesel generators, battery systems, and inverters, with the optimization algorithm determining the optimal sizing of these components.
Step One: Project Setup
In the first step, a new project should be created (Note: To do this, open a new tab). Navigate to Projects and click on the 'New Project' button in the upper right area. You will be taken to the first page of the project settings, Project Setup. Here, you should first change the project's default name to "Training Task 1". Additionally, you can modify the project description. The parameters such as Interest Rate, Simulation Period, and Project Lifetime remain unchanged. If you have questions about individual parameters, you can hover the mouse pointer over the question mark to view the corresponding explanations. Proceed to the next planning step by clicking 'Next' at the bottom of the page.
Step Two: Consumer Selection
On the Consumer Selection page, enter the coordinates "7.699508, 7.710631" into the search field labeled "Search Location within Nigeria" and press Enter. The map will then center on the specified geolocation. To zoom in closer to the location, you can use the mouse wheel or click the '+' symbol on the map interface. Note: While locations can typically be searched by name and country—such as "Ikah Ichala, Nigeria"—the mapping system in use, OpenStreetMap, does not recognize this particular village by name and will display an error message.
Next, using the drawing tool, select all buildings in the area and designate them as consumers. By default, all consumers are designated as households. Reclassify some of these consumers as enterprises and public services according to the specifications outlined in the figure from the task instructions. Detailed instructions on how to use the drawing tools for consumer identification can be found in the tutorial video. Once the consumers have been selected and the settings have been configured, click on 'Next' to proceed to the next planning step.
Step Three: Start Optimization
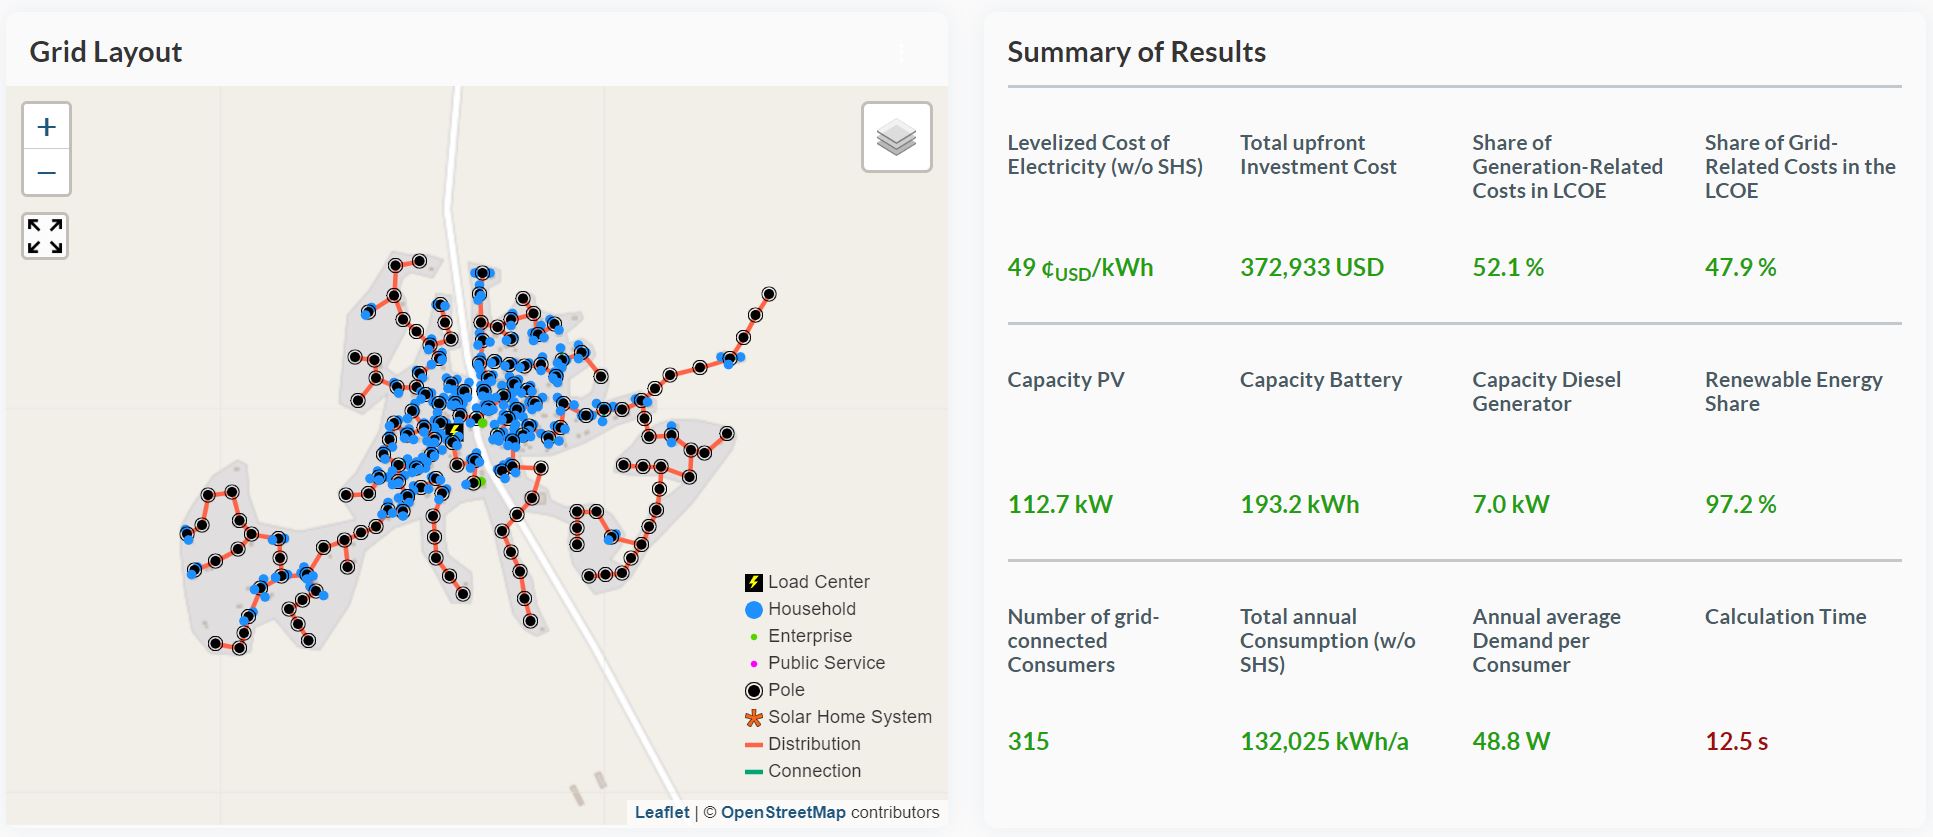
As outlined in the task instructions, no modifications will be made on the subsequent three pages. Please click 'Next' on each page, and on the final page, click 'Optimize'. The optimization process will then begin. Upon completion of the optimization, you will be automatically redirected to the results page.
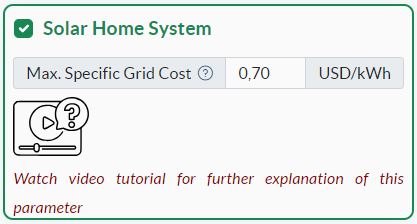
The model created in Task 1 should now be adjusted. To do this, first create a copy of your existing project on the project overview page and then edit it. Currently, all buildings in the area are connected to the grid. However, the OffGridPlanner tool allows for the identification of consumers with high connection costs. These consumers can optionally be equipped with solar home systems to reduce grid construction costs and, consequently, the Levelized Cost of Energy (LCOE) for off-grid systems. To implement this, activate the 'Solar Home System' option under Grid Design and specify a value for the 'Max. Specific Grid Cost' parameter. Initially, set this parameter to 0.70 cents/kWh and then adjust it to 50. On the results page, observe how these changes impact the upfront investment costs of the grid as well as the LCOE.
Step One: Copy and Rename Project
We go back to the Projects page and click on 'Duplicate Project' for the project "Training Task 1" that we just created. Then, we click on 'Edit' in the newly created project and are redirected to the Project Setup page. Here, we change the project name to "Training Task 2".
Step Two: Exclude Consumers with Exceptionally High Connection Costs
To activate the function to exclude consumers with exceptionally high connection costs and equip them with solar home systems, we switch to the Grid Design page. There, we first activate the Solar Home System function and then set the parameter Max. Specific Grid Cost to 0.7 USD/kWh.
Step Three: Start Optimization
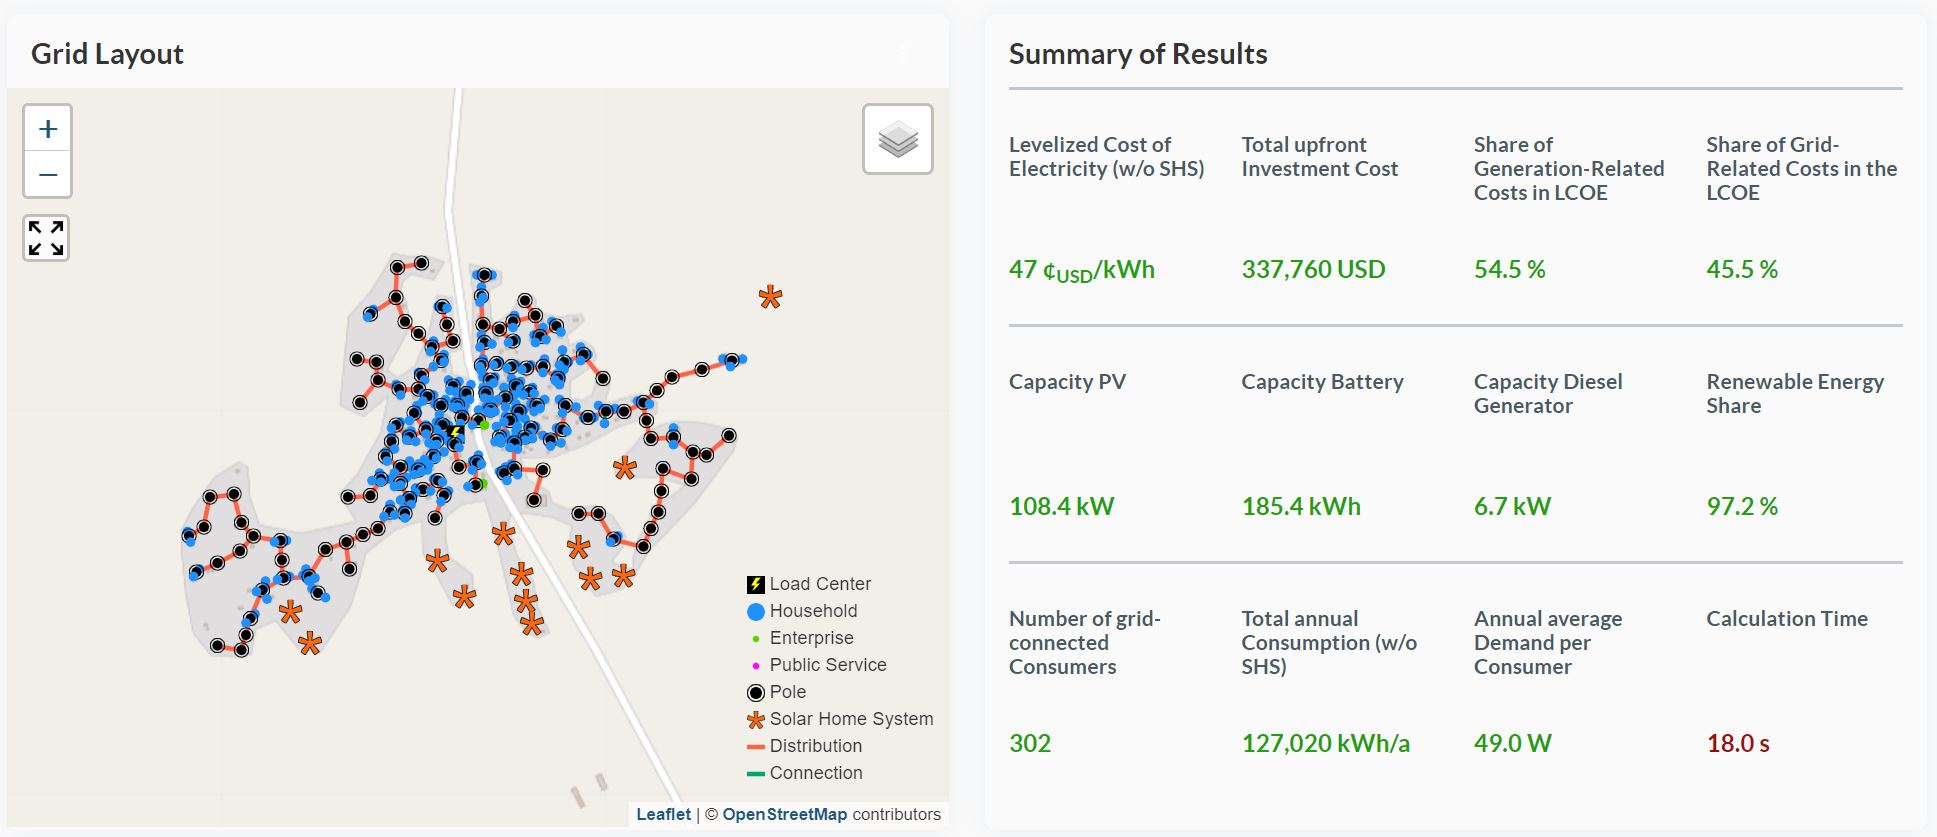
To start the optimization, there are two options. First, navigate to the Energy System Design page, where you will find the 'Optimize' button in the footer, which allows you to start the calculation. The second option is to go to the Results Page. It should be noted that here the results from Task 1 are displayed, not yet the results that take into account the new parameter changes. To update the results, you must click on the 'Recalculate' button.
Results for 70 ¢USD/kWh:

Results for 50 ¢USD/kWh:
Next, we want to make changes to the supply system. So far, we have not selected the "Shortage" option on the Energy System Design page. This means that, up until now, the supply system had to cover the demand at every timestep. However, covering all peak loads can significantly increase the costs for an energy system. Therefore, we will now somewhat limit this requirement and allow an undercoverage of the demand of 5% over the year; at individual timesteps, an undercoverage of 10% is permitted. Observe the effects on the installed capacities and the LCOE.
The model from Task 2, with a maximum specific grid cost value of 50 ¢USD/kWh, is used as the starting point. A copy of the project is created, and its name is changed to "Training Task 3."
Step One: Copy and Rename Project
We go back to the Projects page and click on 'Duplicate Project' for the project "Training Task 2" that we just created. Then, we click on 'Edit' in the newly created project and are redirected to the Project Setup page. Here, we change the project name to "Training Task 3".
Step Two: Permit Shortages to a Limited Extent
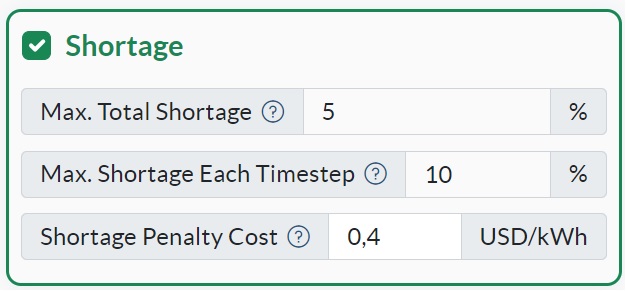
To allow for an undercoverage, the Energy System Design page is navigated to and shortage is activated. The value Max. Total Shortage is set to 5%, and the value Max. Shortage Each Timestep is set to 10 percent. The value Shortage Penalty Cost is set to 0.4 USD/kWh. Note: The Shortage Penalty Cost are added to the objective function in case of a shortfall in demand. This ensures that the shortfall in demand is only utilized when the cost of meeting the demand exceeds the defined threshold value. Otherwise, the solver would always fully utilize shortage, as in this case the total costs are minimized. However, shortage should only be used when meeting the coverage would actually be associated with high costs.
Step Three: Start Optimization
The Optimize button at the bottom of the page is clicked.

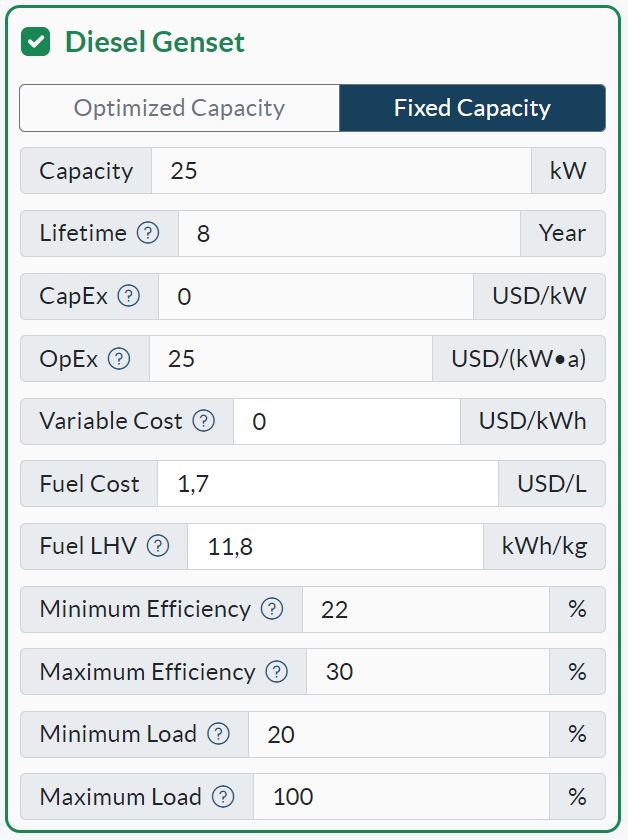
Until now, it has been assumed that there are no existing power supply units on site and all components would need to be procured. However, since a 25 kW motor is already in place, the simulation mode of the diesel genset is now switched from design to dispatch under Energy System Design, and the capacity is stated as per the existing motor. This implies that the optimization model will no longer determine the size of the diesel genset, as this is now user-defined. The model only identifies when the diesel genset will be deployed. Since the investment in the diesel genset has already been made, it is not included in the considerations; thus, the investment costs CapEx are set to zero.
Step One: Copy and Rename Project
We go back to the Projects page and click on 'Duplicate Project' for the project "Training Task 3" that we just created. Then, we click on 'Edit' in the newly created project and are redirected to the Project Setup page. Here, we change the project name to "Training Task 4".
Step Two: Manually determine Capacity of Diesel Genset
- Navigate to the Energy System Design page.
- Switch the capacity determination mode from "Optimized Capacity" to "Fixed Capacity."
- Set the capacity to 25 kW.
- Set the CapEx at 0 USD/kWh.
Step Three: Start Optimization
The Optimize button at the bottom of the page is clicked.
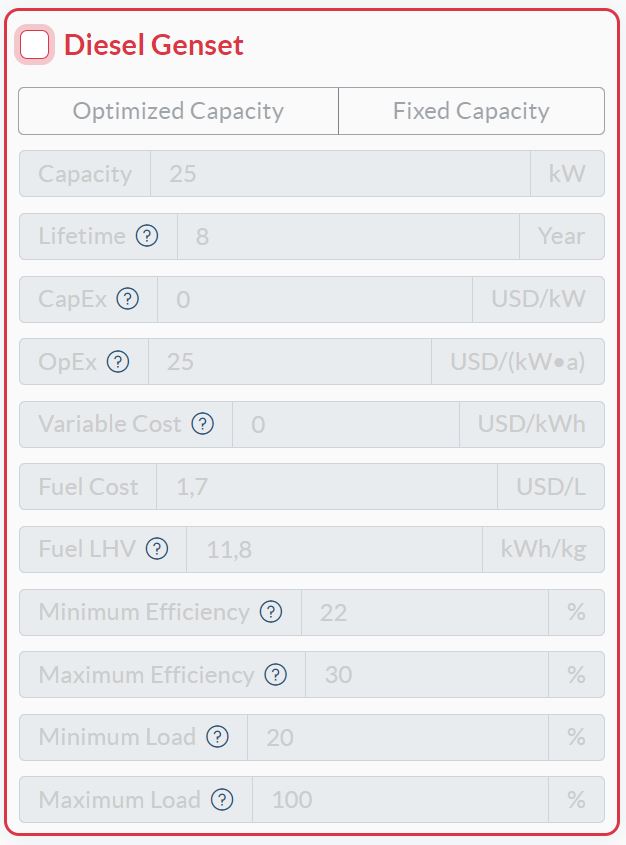
In the final task, the planning of an energy system solely equipped with PV and a battery system, excluding a diesel genset, is explored. To achieve this, the diesel genset option on the Energy System Design page is deactivated, and the calculation is executed again.
After analyzing the results, we will perform a recalculation, this time increasing Max. Total Shortage to 10% and Max. Shortage Each Timestep to 30%, observing the effects on the outcomes.
Step One: Copy and Rename Project
Navigate back to the Projects page and click on 'Duplicate Project' for the project "Training Task 4" that was just created. Then, click on 'Edit' in the newly created project to be redirected to the Project Setup page. Here, change the project name to "Training Task 5".
Step Two: Deselect Diesel Genset
- Navigate to the Energy System Design page.
- Deselect the diesel genset.
Step Three: Start Optimization
Click the Optimize button at the bottom of the page to run the simulation.
Step Four: Increase allowed Shortage and Recalculate
- Set the Max. Total Shortage to 10%.
- Set the Max. Shortage Each Timestep to 30%.
- Click the Optimize button at the bottom of the page to run the simulation. After optimization, compare the results to assess the impact of the changes made.
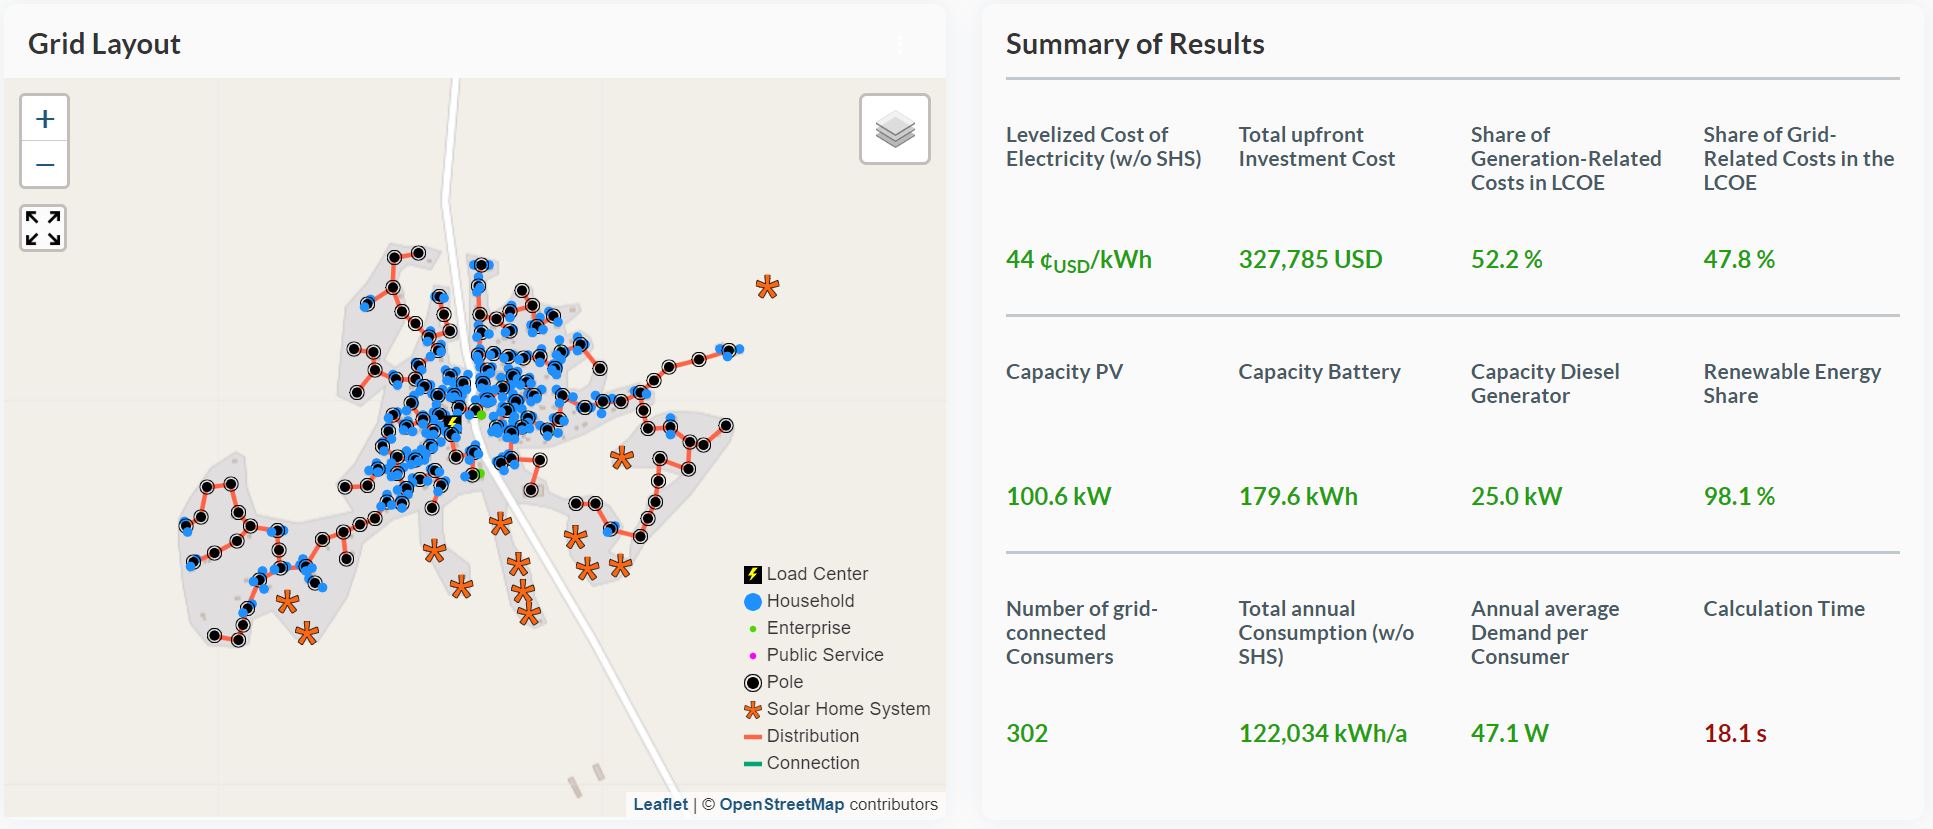
Results for Max. Total Shortage = 5 % and Max. Shortage Each Timestep = 10 %:

Results for Max. Total Shortage = 10 % and Max. Shortage Each Timestep = 30 %:
